

Actually Written: Term 4 2011
A Coles recipe gone brilliantly right!!! Awww, no that’s mean, a LOT of Coles recipes are good (like the mousse cake), just some I always
find very weird…
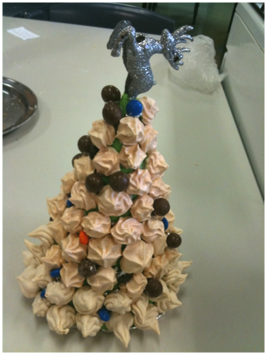
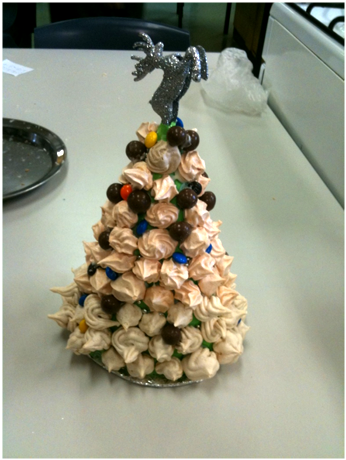
Anyway back to this AMAZING Meringue Tower. So easy. So stunning. So cool. So stare-worthy. Yeah, you know it’s true. Basically, we cut
out a cone shape from an A3 sized cardboard sheet (make sure the cone has a level base), stuck it on a box-thick cardboard slate covered with aluminium and
voila, we are ready to stick.Now we made 1 colour meringues, and used/ate m&ms, maltesers, smarties – any chocolate candy really. On top of the cone, we nipped of the tip and forced the
stand of a Christmas decoration on top for a tree-like effect (not that such a
tree would ever even last till Christmas Morn…)
Personally, if I ever astound people with this again, I would prefer to make a couple of colours in my meringues. Easy, just separate your meringue mixture into a
couple of bowls and add desired food colouring into each. That way there could be a bigger BLAST of colour. You could even add a little flavouring into each
bowl if you wanted.
The possibilities are endless, but all I know is that you get a brilliantly beautiful meringue tower fit for royalty!!!
Meringue Towers/Trees
From: Bi-Lo Christmas Magazine 2010
Makes: 1 tower
Ingredients
- 1 cup white chocolate melts
- 2x 100g worth of mini meringues – any flavour
(store bought or recipe provided below) - Smarties/M&Ms/Jaffa Candy to decorate
- Silver cachous balls to decorate
- Icing sugar and tree top decoration
Method
- Use a compass to cut out a 50cm circle from a sheet of thin white cardboard. Cut the circle in half to make a semicircle, then cut off about one quarter of that semicircle and discard of it. With the remaining piece, place a fingertip on
the curved side (this will form the base) and curve the cardboard to make a cone shape. Holding the cardboard piece, have someone secure the join close to the top with a piece of strong tape. Staple the bottom end of the join and run
a piece of tape along the length of the tape to firmly secure. - Place chocolate melts in a heatproof bowl over a saucepan of simmering water (bowl must not touch water). Stir until chocolate melts. Remove bowl from pan.
- To assemble tower, dip the base of a meringue into melted chocolate and attach to the bottom edge of the cardboard cone (the base and the meringue should sit flush against the cardboard). Repeat to make a row of meringues around base of the cone. Keep dipping meringues in chocolate and attaching in horizontal rows until the cardboard cone is covered. When you get to the last space in each row, choose a meringue that will fit neatly into that space of neatly trim the edges of a meringue to fit if necessary.
- When you get to the tip, use a skewer or chopstick to make a whole in the base of the meringue (I just left the top blank and chopped the cone top till a decoration fitted inside nicely). Dip meringue, hole-side down, into the melted chocolate and place over the tip of the cone. Put cone aside to set.
- Dip smarties and candy in the chocolate (just enough to cover 1/3 of each lolly) and place randomly in the gaps between the meringues. Place Jaffa in larger gaps
and smarties/M&Ms in smaller gaps. - Using a wooden skewer, gently scrape the tip of each meringue (see I didn’t do this step, seriously) so it’s almost flat. With tweezers, carefully pick up cachous and dip in chocolate, then place on tip of a meringue. Repeat with remaining cachous and meringues. Place icing sugar in a small sieve and lightly dust the tower. Crown the tower with a star.
Mini Meringues/
From School Recipes
Makes: A LOT OF SMALL ONES (I don’t remember
the exact number!) – at least 3 trays
Ingredients
- 2 egg whites
- 1/2 cup caster sugar
Method
- Preheat oven to 120 degrees C
- Cover an oven tray with baking paper
- Place egg whites in a medium, clean, dry bowl
- Beat on high speed for 1 minute or until soft peaks form
- Gradually add in sugar, 1 tbs at a time, beating well after each addition, until the
sugar dissolves Add any cocoa powder (1 tbs) or food colourings or essences at this point - Pipe meringue into round shapes (approx. 1 cm in diameter) on the prepared tray
- Bake, uncovered for 20 minutes or until meringue feels dry and firm to touch. Turn oven off, open oven door and leave ajar to let meringues slowly cool in oven


Pingback: Holiday Post #1: Rocky Road | Go Bake Yourself
Pingback: Final Post 2012 « Go Bake Yourself
Pingback: Burnt bones = Look like real bones « Go Bake Yourself